
If you want to go through the detail of this Wsappx program, then we want to tell you that Wsappx is further divided in two sub programs which are AppX deployment service (AppXSVC) and Client License Service (ClipSVC). These two programs have been allotted with two different tasks. Jun 20, 2018 AppX Deployment Service (AppXSVC) Explained. The role of AppXSVC is to launch Store apps. It is worth noting that Universal Windows Platform apps are distributed in AppX packages. This is also the reason why AppXSVC is named that way. To put it another way, this process is essential for updating, installing, and uninstalling Store apps.
Windows 10 1903 comes with lots of New Features security improvements And much faster compared to previous OS versions. Also, Microsoft release day today Updates with bug fixes, Security improvements, and New features. Recently Microsoft Released Windows 10 May 2019 update Version 1903 with a number of new features and security improvements for free. But some of the users Report After installing or Upgrade windows 10 May 2019 update Version 1903 Windows 10 Freezes Applications Not Responding for a long time at startup. This is because after new upgrade Some of your programs and drivers may work without issues, but some may just become incompatible with the current version. If you are also struggling with this Windows 10 freezes after login, Windows 10 keeps freezing on startup, applications not responding in Windows 10, Here We have some solutions you may apply to get back windows 10 PC normal working stage.Having your Windows computer freezing often can be really irritating. As this problem starts after recent windows 10 upgrade The issues mostly encountered due to the incompatibility of hardware and drivers.
Because initially, they were designed to run on your original windows before upgrading, and after the upgrade, they transited permanently into Windows 10. This is by far the most common cause of random hangs & freezes on Windows 10. Disable Startup programsDisable Startup programs which unnecessary load at startup and consume system resources. A lot of programs and drivers load into Windows when you boot. One of them apparently doesn’t play well with others. When windows Start on safe mode, right-click the taskbar and select Task Manager, then click the Startup tab.
If you don’t see a Startup tab, click More details in the lower-left corner.Now on startup impact volume check which programs cause High simply right click on it and select Disable. Do the same for other programs.Disable Startup ServicesAlso, Unnecessary startup services can use extra system resources which became windows slow.
You can disable these startup services by the following below.Press Win + R on Run Type msconfig and hit the enter key. Now on system configuration move to the services tab. Here first check on Hide all Microsoft Services, Now under services dis-select the services which you don’t want to Run At startup. For example, Adobe Acrobat update, google update service etc.Now after disabling them simply click apply and click ok to save the changes you have done.
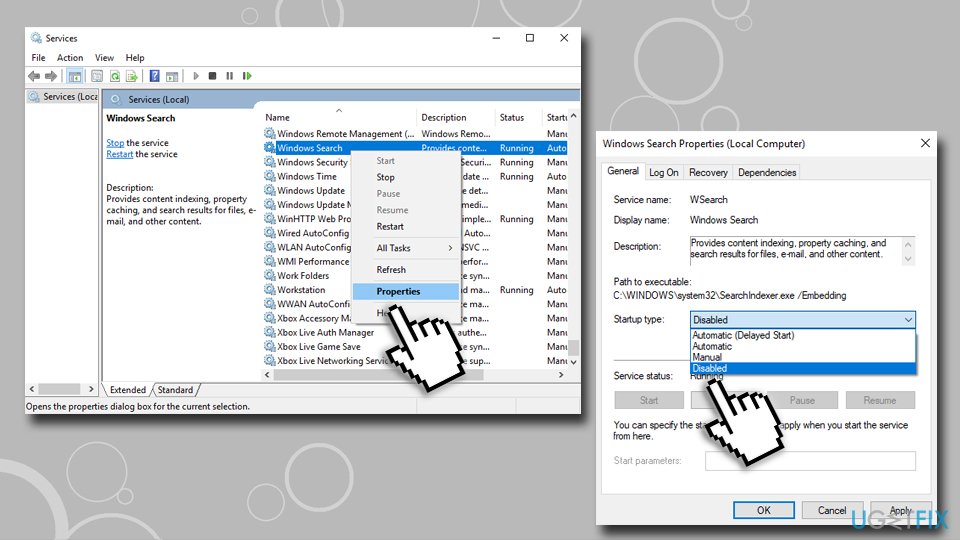
It will ask for restart do it. Disable Update ServicesThis is the most working step I found and most of the windows users report disable startup services increase startup time 10 times better. For me also after disabling startup services ( especially: Windows update service, BIT service, and superfetch ) Fix Windows 10 Freezes Applications Not Responding at startup issue. Here follow below to disable and set manual startup for these services.First press Win + R on Run window Type services.msc and hit the enter key. This will open windows services now scroll down and look for the service windows update. Right-click on it and select properties.Now Change the startup type to disable and click on stop bellow service status to stop the running service. Do the same with Background intelligent transfer service and superfetch service.
After that simply Restart the windows and check hope this step will work for you. Disable fast startupWhen we restarted the machine, everything was back to normal, but this problem appeared again after some time. Sometimes this problem can cause by the Windows 10 feature called Fast Startup, and disabling this feature will solve most of the startup problems include Windows 10 Freezes Applications Not Responding issue.allows your computer to start faster than normal by logging of the user session and saving system related files and drivers to a special hibernation file. Although this feature helps your computer to boot faster, But sometimes it can also cause some problems with booting like it did in this case you can disable Fast startup by following below.On start menu search Type control panel and hit enter key now navigate to:Control PanelHardware and SoundPower OptionsChoose what the power options doHere Click Change settings that are currently unavailable.
And Untick Turn on fast startup (recommended)Then Click Save Changes. Now Restart windows and check the windows 10 startup not responding, Freezes problem solved. Still, need help follow Next solutions. Increase Virtual Memory. Many users have reported that Windows 10 freezing or not responding issue was fixed by increasing the Virtual MemoryVirtual Memory on the windows computer.
Virtual memory combines your computer’s RAM with temporary space on your hard disk called the Swap file or Pagefile. Whenever RAM is not enough to complete task windows move data to paging file and frees up RAM so that your computer can complete its task.
Virtual memory is supposed to act as a savior where the physical memory (RAM) runs out when running resource-intensive programs. You can check out Disable background appsMicrosoft is a big fan of its native universal apps, which might be why it allows them to run in the background even when you haven’t actually launched them. That means you can access their features more quickly, but it’s a waste of system resources. And when the most of the system resources used by background apps then also system may cause the windows 10 not responding problem.We recommend to if you don’t use these apps on a regular basis. Do modify software running in the background, go to Settings from the Start menu then click Privacy and Background apps. Turn off the toggle switches next to the apps you don’t want to have running all the time.
Of course, you can still launch these programs manually if you need them.Disable AppXSvcAppX Deployment Service (AppXSvc) is a service that supports the deployment of Store applications. A number of windows users Report after disable the AppXSvc service the problem startup freeze, not responding for a long time get fixed. To Disable AppXSvc follow below:To disable the AppXSvc we need to tweak on windows registry. First open Windows Registry Editor by Press Windows key + R, input regedit and then click OK.Now on Registry Editor, navigate to the following path:HKEYLOCALMACHINESYSTEMControlSet001ServicesAppXSvcWhen here, double click the Start DWORD in the right-hand pane.
Change the Value data to 4, click OK, then restart your system. You can Change this back to 3 if you want to enable AppXSvc again.Above methods are the best solutions to fix Windows 10 Freezes Applications Not Responding, Windows screen get stuck after login include different startup problems. If you still getting problem Fallow some other solutions. Like Check with a different user account, Repair corrupt system files, update outdated Drivers etc. Create a New User AccountSometimes when user account gets corrupt it will show different Startup Errors include windows became slow and not responding for a long time. If after performing all methods still you getting same windows 10 not responding issue, we recommend to and login with the newly created user account and check this time problem fixed or not.You can create user account simply using a command line. First, open the command prompt as administrator.
Type below command and hit enter key to execute the command.net user user name password /addNote Change username with the username you want to create and change password which you want to log in for the newly created user account.Repair Corrupt System FilesAlso, Corrupt system files can cause different windows Errors include system became slow, Freezes and not respond for a long time. You can Run The Windows sfc utility to repair and replace corrupt system files. To do this simply Open command prompt as administrator and type sfc /scannow and hit the enter key. Wait until 100% complete the scanning process. After that restart windows and check problem solved, windows work smoothly. Also Run to repair the system image And Windows PE.Also, you can use third-party software like CCleaner to clean junk and temp files. And repair corrupt or broken registry entries which cause windows to run smoothly.
Update old incompatible DriversMost of the times old and incompatible drivers can cause different Errors problems. We recommend to always Install latest drivers and make windows drivers updated. You can update drivers via Device Manager or you can download the latest driver software from the manufacturer’s site and install manually.To update Drivers through device manager Hold the Windows Key and Press X. Here select Device Manager and look any driver with yellow triangle mark.
If found any simply Right click and select Update driver software - Search automatically for updated driver software - And proceed with the instructions on the screen. Recommend To update mainlyDisplay driverNetwork Adaptor DriverAudio DriverAfter update Reboot your computer and check.
If it does then go to the manufacturer’s site, and download the drivers from there and install them, reboot and test. Once you’ve updated the graphics driver and the issue persists, update the audio driver in the same way and test.Navigate to Display adapters. Right-click your graphics card name, (write down the name of the adapter on a paper as well) and then Choose Update driver software - Search automatically for updated driver software - And proceed with the instructions on the screen. If the driver is found and updated, reboot PC and then test for a while to see if it still hangs or freezes. If it does then go to the manufacturer’s site, and download the drivers from there and install them, reboot and test. Once you’ve updated the graphics driver and the issue persists, update the audio driver in the same way and test.These Are some Best working solutions to fix Windows 10 Freezes Applications Not Responding for a long time at startup.
Windows 10 freezes after login, Windows 10 keeps freezing on startup, applications not responding in Windows 10. I hope these solutions help to resolve Windows 10 startup problem on your system, Still, have any query, a suggestion about this post feel free to discuss on comments below Also Read.
Okay please help. I've had success asking this community before when I was desperate, so I'll try again. I Just bought an ASUS gaming laptop that had Windows 8.1.
I had high disk usage with windows 8 so without really trying to dig into the problem I thought upgrading to Windows 10 would fix it. Well, I was wrong. So I started digging and looking online then listened to other threads telling me to look on my resource monitor which helped me see it's svchost(wsappx) constantly using the disk up to 100%. Trying pretty much everything, I've found it it's virtually impossible to disable or delete wsappx and it's components. Finding out it has to do with the Windows store, I really want it gone because I have no care for the store and it's making this laptop close to useless. I have two screenshots.
But I don't know how to attach them.UPDATEtrying out a lot of fixes over the internet like disabling superfetch, BITS, antivirus and more seem to somewhat reduce it, but any program I open causes it to rocket up to 100% disk usage. Like file explorer, chrome, skype, or steam.
After trying out a fix that used regedit to create a run command for the store to not open, that seemed to fix wsappx opening for while before it randomly opened right back up. I was wondering if it was just this drive going bad even though I just got the computer about a week ago. I can change the hard drive myself but I didn't know if I'd lose my three year protection warranty from best buy if I opened the laptop up. No worries about the post, mate.So this really sounds like it might be caused by a virus or malware even if you were unable to detect anything. Perhaps you could try downloading an anti-malware program specifically and see what you find out with it.On the other hand if you're set for a clean/fresh install (which is definitely a good thing having in mind your case). You should have no issues removing everything from the drive and wiping it clean. If you're worried that there might be something left after you format it, you can use a low level format (a.k.a.
Write Zeros). This type of format writes a 0 or a 'blank' if you will, on each individual sector of your drive (which means that the larger the HDD is, the longer it will take). After that even data recovery companies won't be able to recover any data. The idea is that this basically wipes out everything.
So you could do that by connecting this drive to a different computer and running a low level format, either via DISKPART, or by downloading an HDD diagnostic tool (most of them have that option) and formatting the drive this way.Here's the DISKPART option:1. Open CMD (Command Prompt) as administrator2. Type diskpart and press 'enter'3. Type list disk and press 'enter', you should see all the drives connected to the computer4. You can find out which drive you need to format by its size. Once you're sure which one is yours type select disk X and press 'enter' (where 'X' is the number of the disk you wish to format, so don't forget to change it - e.g. 'select disk 1')5.
You should get a message that the disk is selected. Type 'clean all' and press 'enter'. All that's left after that is to wait for the process to finish. You should see a message like 'diskpart succeeded in cleaning the disk'.As I've already mentioned this could take hours, depending on the drive's size.
Once the drive has been low level formatted, you should initialize it. Here's how to do it:.Once you're done with that, your drive should be ready.
Go ahead and connect it to your computer and make a fresh install of Windows. On the other hand, if you decide to go with the SSD, you could still perform a low level format on the HDD and initialize and partition the drive afterwords as you see fit, so that you can use it as a secondary storage drive.Note that in order to avoid possible issues with your OS in the future, I'd recommend that you have only the drive you're installing Windows to connected to the motherboard during the installation process.Please let me know if you have any questions whatsoever.Good luck! Hey there, Brandon.You could try out this option as well: Although since disabling superfetch, BITS, Windows Search, etc. Didn't help at all perhaps you can jump directly to this one: sounds like it's not a problem related to the drive at all, but if you worry about that, you could download the HDD manufacturer's diagnostic tool (or a 3rd party diagnostic tool if the manufacturer doesn't offer one) and test the drive.Ultimately if nothing seems to be working, I'd advise you to get in touch with Microsoft's customer support, to see if they can help with that.Please let me know how everything goes.BoogiemanWD. Well it's worth the try.
Check for updates of all your drivers either by going to the laptop manufacturer's website and searching for the ones for your laptop model, or by searching for each individual component on their respective websites. I know that the second option is a lot more tedious than the first, but sometimes laptop manufacturer's take some more time to list the newest versions of the drivers that come out all the time for all the different parts, so you might find newer versions on the particular component's website.If it's a driver issue you might want to consult wit the laptop manufacturer's customer support instead of Microsoft, to see if they can point you in the right direction.Please keep me updated on your progress. Last night when I got home ready to attempt to fix the laptop I might have found something I wasn't expecting when in all honesty I was dumb for that not being my first assumption when I found these issues. I've seen programs on that computer that I would assume don't come with it, like skype, xsplit broadcaster and a few other applications I can't exactly remember right now. But silly me let them slip not really thinking about it. This laptop was an open box at best buy for 999$ original price was 1375$.

It was still wrapped in plastic and when started up had the normal first time procedure of starting windows so I assumed it has already been wiped from the store before attempting to sell. But apparently not. I've seen skype, google chrome and cortana open randomly at times during startup even when I've had startup disabled for skype. But for the first time last night, chrome opened with a pre-typed out search on Bing of sexual acts (not getting into specifics) resulting in images and website links to pornographic websites. So immediately I thought, crap this stupid thing has a virus.
So closing chrome I opened my up to date trend micro antivirus+ and did a full scan with no results. Turning that off, I installed avast and did a full scan with no results too. So uninstalling things I had no idea what they are, I did research on a few of the things causing the 100% disk usage which was mainly 'system and compressed memory' also 'system', 'svhost' and 'conhost.exe'. Among the research I found that conhost.exe could possibly be the Trojan sending information to another system and/or using Wi-Fi/disk to download malicious files. Also read that dwm.exe and one other Microsoft named program I can't remember, are also apart of the Trojan which I found all three programs running. But I read that if found in file location of system32, they're normal legit programs. Which is where I found them located.
I also found a program named umonit64.exe that was possibly a virus. But all these things I found weren't obvious to me whether or not they're threats since I'm still new to the virus type stuff. I tried my best to find out exactly what it was, but everything seemed to check out for me which made no sense as to why chrome and other apps open on their own specially chromes pre-typed Bing search. So I figured the easiest most stress free way for me to fix this issue, was to wipe the hard drive entirely and re-install Windows. But doing some research I read that some viruses can somehow still reside in the drive even after the wipe which is very rare. So my plan of action is to today after work, I'll be stopping by Wal-Mart to hopefully buy a Samsung ssd to install Windows on then take out the old hard drive in hopes I can completely delete everything on it some other way.I'm also hoping that getting a new drive especially an ssd, would fix my disk usage crap that may or may not be the Trojan. Any advice would be well apreciated.
Also, sorry for this very long post. No worries about the post, mate.So this really sounds like it might be caused by a virus or malware even if you were unable to detect anything. Perhaps you could try downloading an anti-malware program specifically and see what you find out with it.On the other hand if you're set for a clean/fresh install (which is definitely a good thing having in mind your case). You should have no issues removing everything from the drive and wiping it clean.
If you're worried that there might be something left after you format it, you can use a low level format (a.k.a. Write Zeros). This type of format writes a 0 or a 'blank' if you will, on each individual sector of your drive (which means that the larger the HDD is, the longer it will take).
After that even data recovery companies won't be able to recover any data. The idea is that this basically wipes out everything. So you could do that by connecting this drive to a different computer and running a low level format, either via DISKPART, or by downloading an HDD diagnostic tool (most of them have that option) and formatting the drive this way.Here's the DISKPART option:1.
Open CMD (Command Prompt) as administrator2. Type diskpart and press 'enter'3.
Type list disk and press 'enter', you should see all the drives connected to the computer4. You can find out which drive you need to format by its size. Once you're sure which one is yours type select disk X and press 'enter' (where 'X' is the number of the disk you wish to format, so don't forget to change it - e.g. 'select disk 1')5. You should get a message that the disk is selected.
Type 'clean all' and press 'enter'. All that's left after that is to wait for the process to finish. You should see a message like 'diskpart succeeded in cleaning the disk'.As I've already mentioned this could take hours, depending on the drive's size. Once the drive has been low level formatted, you should initialize it. Here's how to do it:.Once you're done with that, your drive should be ready. Go ahead and connect it to your computer and make a fresh install of Windows. On the other hand, if you decide to go with the SSD, you could still perform a low level format on the HDD and initialize and partition the drive afterwords as you see fit, so that you can use it as a secondary storage drive.Note that in order to avoid possible issues with your OS in the future, I'd recommend that you have only the drive you're installing Windows to connected to the motherboard during the installation process.Please let me know if you have any questions whatsoever.Good luck!
Download Maxima 5.38 for Mac from our website for free. The Maxima installer is commonly called wxMaxima-0.8.2-Maxima-5.18.1.dmg. Our antivirus check shows that this Mac download is virus free. This free software for Mac OS X is an intellectual property of Maxima Team. The most popular versions of the application are 5.3 and 5.1. Maxima download for mac pro.
It will take a lot of time probably a couple of hours for a 1TB drive. It doesn't matter how full it is as it wipes each sector of the drive no matter if there's data on it or not.Hopefully it doesn't turn out to be a virus, but just in case it is - just disconnect the HDD, connect the SSD, install Windows, install an anti-malware and an anti-virus programs and update their databases. After that connect the HDD and without accessing it, just go ahead and follow the DISKPART steps to wipe it clean, if you don't have important data on it.
The drivers you have from a different computer won't do the job. But don't worry, it's as easy as going to the laptop manufacturer's website and downloading all the drivers you need for your model. The only problem that I can think of is that you'd have to use a different computer to download at least the driver for your wireless adapter. After you install it on your laptop you can then download the rest of the drivers directly with it, once you're able to connect to your Wi-Fi network.But as I said, all laptop manufacturer's have a section in their websites for downloading drivers. Usually you specify the model from a drop down menu and specify the OS as well and you get the drivers necessary for that laptop model and version of Windows.Let me know how it goes.
- Author: admin
- Category: Category